How to get HD (OpenGL) working on Mac OSX High Sierra / Mojave
Note: This solution still works on OSX Mojave 10.14, tested October 2018.
Hey guys,
So after recently upgrading my Mac from Sierra to High Sierra, I noticed that HD was broken. I tried re-installing Java 1.6 as outlined in my other tutorial, but I had no luck getting HD to work again.
I decided to dig deeper into this to figure out what the problem was, and although there was no easy way to get it working again, I’ve found a solution that some of you may find useful. It comes down to moving a few files into the correct directory (as the location has changed in Mac OSX but we need them in the old location). This will work for High Sierra and presumably any future releases.
NOTE: This is ONLY for users of High Sierra. If you are on Sierra or a previous version of OSX, your HD should work fine without this tutorial!
IMPORTANT: Firstly, make sure that you follow the Java 1.6 tutorial found here:
http://www.alora.io/forums/topic/15711-how-to-get-hd-working-on-mac-osx/
Step 1: Disabling System Integrity Protection (SIP) and allowing hidden files to be seen
Once Java 1.6 is installed, we’re going to have to turn off “System Integrity Protection” (SIP) on our system as we’ll need to have more access to it.
Here’s how you can do this:
Follow these steps to disable SIP:
- Restart your Mac.
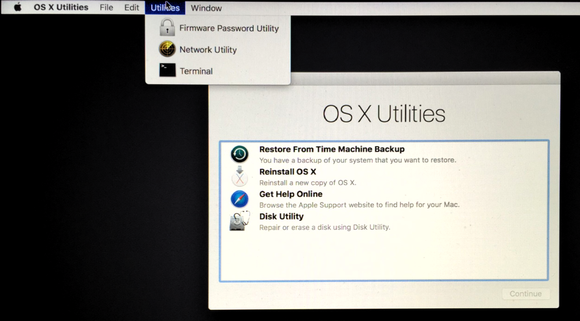
- Before OS X starts up, hold down Command(⌘)-R and keep it held down until you see an Apple icon and a progress bar. Release. This boots you into Recovery.
- From the Utilities menu, select Terminal.
- At the prompt type exactly the following and then press Return: csrutil disable
- Terminal should display a message that SIP was disabled.
- We’ll also need to run another command to be able to view hidden files. Enter the following and then press Return: defaults write com.apple.finder AppleShowAllFiles YES
- From the menu, select Restart.


At this point, your Mac should be loaded up and your “SIP” disabled, as well as hidden files now being visible. As I mentioned earlier, we need to copy and paste some files from one directory into another.
First, we’ll find the files and copy them…
Step 2: Moving the necessary files to the correct location
- Open up Finder, and on the top bar (very top of the screen) you can click Go -> Go to Folder… (or use the Command(⌘)-Shift-G shortcut) and then type in “/Library/Java/JavaVirtualMachines/1.6.0.jdk/Contents/Libraries“. This will take us to the folder where we need to copy files from.
- Once you are in the Java libraries folder, you’ll see a bunch of files. What you want to do now is copy all of them (Command(⌘)-A and then Command(⌘)-C).
- Optionally, you can copy and paste these into a folder on your desktop to make sure you don’t need to come back here.
- Now that those files are copied, we’ll need to go to the second location where we want to paste the files. In Finder again, on the top bar (very top of the screen) you can click Go -> Go to Folder… (or use the Command(⌘)-Shift-G shortcut) and then type in “/System/Library/Frameworks/JavaVM.framework/“.
- Once you are in this folder, you’ll need to right-click and select the “New Folder” option. Name this folder “Libraries” (case sensitive!).
- Enter the newly created “Libraries” directory, and then paste your copied files into it (You can use Command(⌘)-V to paste them in).
- Almost done! Alora should now be able to run in HD. Read on for Step 3 to make sure we re-enable your SIP as this is crucial for your Mac’s protection.
Step 3: Re-enabling System Integrity Protection (SIP) and (optionally) re-hiding hidden files
Note: Please do not overlook this step. It is a hassle rebooting again, but you MUST re-enable your System Integrity Protection (SIP). You just need to follow Step 1 with slight changes:
- Restart your Mac.
- Before OS X starts up, hold down Command(⌘)-R and keep it held down until you see an Apple icon and a progress bar. Release. This boots you into Recovery.
- From the Utilities menu, select Terminal.
- At the prompt type exactly the following and then press Return: csrutil enable
- Terminal should display a message that SIP was enabled.
- OPTIONAL: We can also run the other command to hide “hidden” files again. This isn’t necessary, and I personally keep my hidden files all visible, but if you’d like them to be hidden then you can enter the following and then press Return: defaults write com.apple.finder AppleShowAllFiles NO
- From the menu, select Restart.
That’s all! Your computer is secure once again, and you should now be able to run HD on High Sierra!
If anyone finds this too technical for them or they do not want to take any chances, send me a PM and I would be glad to hop on TeamViewer to help you out where I can. Of course, you will need to do Step 1 yourself as it requires rebooting your Mac and I cannot stay on TeamViewer for that portion.
Enjoy :)
Regards,
Omicron


 This topic is locked


